Focus on Photography — Teacher Guide
Complete documentation for managing your photography class
📋 Table of Contents
🚀 Getting Started
Plugin Installation
- Log into WordPress admin at
students.montessoricenter.org/wp-admin - Go to Plugins → Add New → Upload Plugin
- Choose the
focus-on-photography.zipfile - Click Install Now, then Activate
First-Time Setup
After activation, you’ll see a new Focus on Photography menu in the left sidebar with these sections:
- Dashboard — Overview and quick actions
- Students — Manage enrolled students
- Sessions — Create and manage class sessions
- Weeks — Configure weekly themes, quotes, and challenges
- Quotes — Inspirational quotes library
- Challenges — Weekly photography challenges
- Settings — Plugin configuration
- Uploads — View and manage all student photo submissions
Initial Configuration
- Go to Focus on Photography → Settings
- Review the default settings:
- Edit Token Duration: 30 minutes (how long students can edit after uploading)
- Max Photos Per Week: 1 per student per week
- Gallery Columns: 3 (responsive grid)
- Adjust as needed and click Save Settings
📅 Setting Up Your First Session
A “session” represents one complete 8-week photography class. You’ll create a new session each time you start a new class.
Create a Session
- Go to Focus on Photography → Sessions
- Click Add New Session
- Fill in the details:
- Session Name: e.g., “Spring 2026 Photography”
- Start Date: First day of class
- End Date: Last day of class (typically 8 weeks later)
- Click Create Session
Add Class Weeks
Each session needs weekly terms for organizing photos:
- From the Sessions page, click Manage Weeks next to your session
- Click Generate Weeks to auto-create 8 weeks based on your start date
- Or manually add weeks with Add Week:
- Week Name: e.g., “Week 1: Light & Shadow”
- Week Number: 1-8
- Theme (optional): Brief description
Enroll Students
- Go to Focus on Photography → Students
- Click Add New Student
- Enter:
- First Name (required)
- Session: Select from dropdown
- Click Add Student
- Repeat for all students (typically 10)
⏱️ Weekly Class Workflow
Here’s a typical 45-minute class session:
Before Class (5 min prep)
1. Set the Current Week:
- Go to Focus on Photography → Sessions
- Click Set Active Week and choose the current week
2. Assign the Challenge:
- Go to Focus on Photography → Challenges
- Either select a pre-made challenge or create a new one
- Click Assign to Current Week
3. Queue Today’s Quote:
- The plugin automatically rotates quotes
- Or go to Quotes and click Set as Today’s Quote on a specific one
During Class
| Time | Activity | Details |
|---|---|---|
| 5 min | Opening | Discuss Quote of the Day, review This Week’s Challenge |
| 15 min | Photo Review | Browse gallery, discuss composition, lighting, subject choices |
| 15 min | Photo Capture | Students take photos, can shoot multiple and choose best |
| 10 min | Upload & Journalette | Students upload photo and write reflection |
Student Upload Process
- Student taps their name tile on the gallery page (pre-fills their name), then taps Upload Photo
— OR goes directly to the upload page and types their name (autocomplete suggestions appear) - Selects or takes their photo
- Writes their Journalette (brief reflection, 1-3 sentences):
- What did you capture?
- Why did you choose this?
- What do you see?
- Taps Submit
After Class
- Review Uploads:
- Go to Focus on Photography → Dashboard
- Check “Recent Uploads” to see what was submitted
- Award Stickers (optional):
- Click on any photo to open it
- Use the sticker panel to award recognition
- Teacher Edits (if needed):
- Click any photo to edit the journalette
- Fix spelling, clarify meaning, or add context
- Teacher edits have no time limit
👥 Managing Students
View All Students
Go to Focus on Photography → Students to see:
- Student name (First Name)
- Assigned session
- Photo count
- Last upload date
Edit a Student
- Click the student’s name
- Update their information
- Click Save Changes
Transfer Between Sessions
If a student needs to move to a different session:
- Edit the student
- Change the Session dropdown
- Save — their photos stay with them
Remove a Student
- Click Delete next to the student’s name
- Confirm the action
Note: This removes the student record but preserves their photos in the gallery.
🎯 Working with Challenges
Pre-Loaded Challenges
The plugin comes with 50+ photography challenges suitable for middle school students. Browse them at Focus on Photography → Challenges.
Create a Custom Challenge
- Go to Challenges → Add New
- Fill in:
- Title: Short, catchy name (e.g., “Shadow Hunter”)
- Description: What students should photograph
- Tips: 2-3 helpful hints for success
- Difficulty: Easy / Medium / Challenging
- Click Save Challenge
Assign to a Week
- Find the challenge you want to use
- Click Assign to Week
- Select the session and week
- The challenge now appears on the gallery for that week
Challenge Ideas by Week
| Week | Theme | Challenge Example |
|---|---|---|
| 1 | Light & Shadow | Find an interesting shadow and capture it |
| 2 | Color | Photograph something in your favorite color |
| 3 | Texture | Get close to something with an interesting surface |
| 4 | Patterns | Find repeating shapes or designs |
| 5 | Nature | Capture something living (plant, animal, insect) |
| 6 | People | Photograph hands doing something |
| 7 | Perspective | Take a photo from an unusual angle |
| 8 | Story | Capture a moment that tells a story |
💬 Working with Quotes
The plugin includes a library of inspirational photography quotes that display on the gallery page. These quotes are designed to spark discussion and motivate students.
How Quotes Work
By default, the plugin automatically rotates through your quotes library. Each day, a different random quote is displayed to students. You don’t need to do anything—the rotation happens automatically.
Setting Today’s Quote (Manual Override)
Sometimes you may want to display a specific quote that relates to your lesson or the week’s challenge. Here’s how:
- Go to Focus on Photography → Quotes
- Find the quote you want to feature
- Click Today’s Quote (gold link) in the Actions column
- The quote is now set for today
Auto-Rotate vs Manual Override
| Mode | How It Works | When to Use |
|---|---|---|
| Auto-Rotate (default) | Plugin randomly selects a quote each day | Most days—set it and forget it |
| Manual Override | You choose a specific quote for today | When a quote ties into your lesson |
- A manual override lasts only until midnight
- The next day, auto-rotation automatically resumes
- You never need to “clear” or “reset” a manual selection
- Set a new Today’s Quote anytime to change the override
Managing the Quotes Library
Add a New Quote
- Go to Focus on Photography → Quotes
- Scroll to the “Add New Quote” form
- Enter:
- Quote Text: The quote itself
- Author: Who said it (e.g., “Ansel Adams”)
- Click Add Quote
Edit or Delete Quotes
- Edit: Click the quote text in the table to modify it
- Delete: Click Delete in the Actions column
Quote Display Locations
Quotes appear in these locations:
- Gallery Page: At the top, above the challenge
- Shortcode: Use
Every artist was first an amateur. — Ralph Waldo Emerson
🖼️ The Photo Gallery
Create the Public Gallery Page
- Go to Pages → Add New
- Title it “Photography Gallery” (or similar)
- Add the shortcode:
In the right light, at the right time, everything is extraordinary. — Aaron Rose
This Week's ChallengePath Lines
Use lines, paths, or edges to guide the viewer’s eye.
Week 5Composition is arranging parts of the image so they work together
Click or tap on the dots to see just the photos for that week.
✓Paying Attention✓Changing Perspective✓Photo-graphy✓DSLR Basics5CompositionView:Our Photographers
Mr. Roger
"Adopt the pace of nature: her secret is patience." — Ralph Waldo Emerson
Week 3
Window and bushes
This photo shows the window of the house and some bushes
Week 3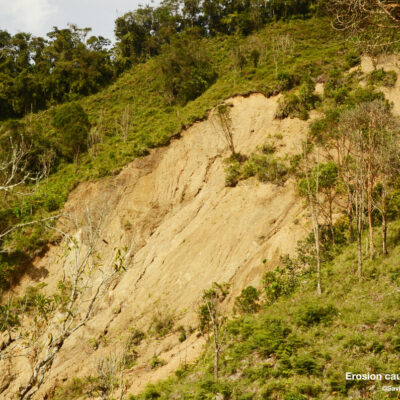
Erosion from over-grazing
Photo shows erosion due to over-grazing
Week 1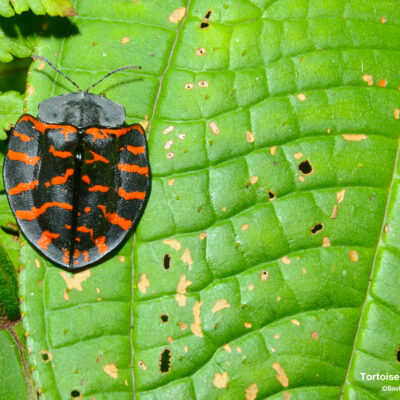
Tortoise Beetle
A tortoise beetle on a leaf in the rainforest.
Week 2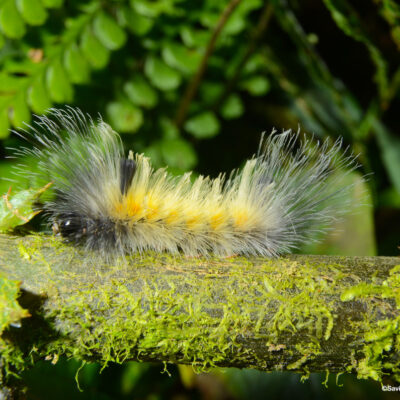
A Very Hairy Catepillar
A colorful hairy caterpillar moves along a log in the rainforest.
Week 3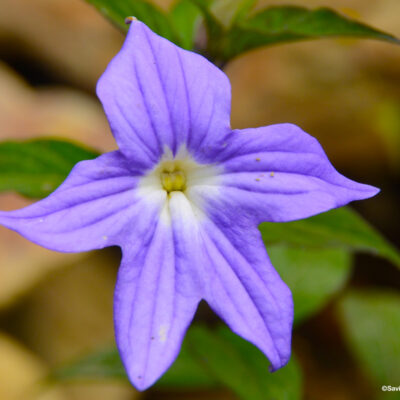
Purple flower in the cloud forest
A purple flower growing in the cloud forest in Colombia.
- Publish the page
Gallery Features
The gallery displays:
- Quote of the Day — Rotates from your quotes library
- This Week’s Challenge — Current assignment with tips
- Class Collage — Mosaic of all photos (when available)
- Student Tiles — Grid of student names for quick access
- Photo Grid — All photos from the current session
Filtering & Navigation
Students and teachers can:
- Filter by week using the week selector
- Click a student tile to see only their photos
- Click any photo to view full-size with journalette
- Navigate between photos with arrows
Student View vs Teacher View
| Feature | Student | Teacher |
|---|---|---|
| View all photos | ✓ | ✓ |
| Upload own photo | ✓ | ✓ |
| Edit own journalette | ✓ (30 min) | ✓ (always) |
| Edit any journalette | ✗ | ✓ |
| Give feedback stickers | ✓ | ✓ |
| Delete photos | ✗ | ✓ |
📤 Managing Uploads
The Uploads page gives you a central view of all student photo submissions, with tools to manage and moderate content.
Viewing All Photos
- Go to Focus on Photography → Uploads
- Use the filters to narrow by:
- Week — Show photos from a specific week
- Student — Show all photos from one student
- Click any photo thumbnail to see full details
Quick Actions
Each photo in the list has action buttons:
- ⭐ Feature/Unfeature — Mark as “Student’s Choice” (adds gold border in gallery)
- ✏️ Edit — Modify caption, notes, or other details
- 🗑️ Delete — Permanently remove the photo (use with caution!)
Bulk Actions
To manage multiple photos at once:
- Check the boxes next to photos you want to modify
- Select an action from the Bulk Actions dropdown
- Click Apply
🎓 Graduation & Export
At the end of your 8-week session, create a graduation package for students and families.
Generate Class Collage
- Go to Focus on Photography → Sessions
- Click Generate Collage next to your session
- Wait for processing (may take 30-60 seconds)
- Preview the collage — a beautiful mosaic of all class photos
Export Graduation Package
- From Sessions, click Export Graduation Package
- The system generates:
- Individual Student Folders containing:
- All of that student’s photos (full resolution)
- Personalized certificate of completion (JPG)
- Class Collage (high-resolution JPG)
- Session Summary (text file with dates, student list)
- Individual Student Folders containing:
- Download the ZIP file when ready
Certificate Contents
Each student receives a certificate showing:
- Student name
- Session name
- Session dates (e.g., “January 15 – March 10, 2026”)
- Decorative photography-themed design
- Ready for printing at standard letter size (landscape)
Distribute to Families
Options for sharing:
- Print certificates for an in-class graduation ceremony
- Email ZIP file links to parents (via your school’s system)
- Upload to your school’s family portal
- Create USB drives for each student
📦 Archiving Sessions
After exporting and distributing graduation materials, archive the session:
Archive a Session
- Go to Focus on Photography → Sessions
- Click Archive next to the completed session
- Confirm the action
What Archiving Does
- Moves the session to “Archived” status
- Photos remain in the database but hidden from active gallery
- Frees up the gallery for your next class
- Student records preserved for reference
View Archived Sessions
- Go to Sessions
- Click the Archived tab
- You can restore or permanently delete archived sessions
Start Fresh
After archiving, you’re ready to:
- Create a new session
- Enroll new students (or transfer returning students)
- Begin your next 8-week photography adventure!
💡 Tips & Troubleshooting
Best Practices
- Create session and weeks before first class
- Pre-assign challenges for all 8 weeks
- Review quotes library for appropriateness
- Have tablets charged and logged in
- Assign tablet numbers to students
- Keep a paper backup list of names
- Wipe the tablet camera lens
- Remind them: “Get closer!”
- Discuss rule of thirds before Week 3
- Read quote of the day aloud
- Have students explain journalettes
- Celebrate sticker awards publicly
Common Issues
The 30-minute edit window has expired.
Solution: Teacher can edit any journalette at any time.
- Check file size (max 10MB)
- Ensure tablet has internet connection
- Try refreshing the page and re-selecting the photo
Go to the photo in WordPress admin → Click Edit → Change the assigned student from the dropdown → Save changes.
- Ensure GD library is installed on server (contact host)
- Check that photos exist for the session
- Try with fewer photos first (test with 5-10)
- Verify students have photos in the session
- Check server temp directory permissions
- Contact hosting support if persistent
Getting Help
For technical issues:
- Check this guide first
- Note the exact error message (screenshot if possible)
- Contact your school’s IT administrator
- They can reach the plugin developer if needed
📌 Quick Reference Card
Shortcodes
| Shortcode | Purpose |
|---|---|
|
Main gallery with all features |
|
Show specific week only |
|
Show specific student only (use student slug) |
|
Display quote of the day only |
|
Display current challenge only |
Sticker Meanings
Photography Feedback — Students use these to give peer feedback on technique:
| Sticker | Meaning | What It Recognizes |
|---|---|---|
| 📸 | Composition | Strong arrangement of elements in frame |
| 💡 | Creative idea | Clever or original concept |
| 🎨 | Beautiful colors | Eye-catching or harmonious color use |
| ✨ | Amazing lighting | Great use of light and shadow |
| 🔥 | Great shot | Overall excellence — “This is fire!” |
| ❤️ | Love it | Emotional connection or appeal |
Recognition Awards — Teachers (or peers) use these for special recognition:
| Sticker | Meaning | When to Award |
|---|---|---|
| ⭐ | Weekly standout | Best photo of the week |
| 🏆 | Challenge winner | Best met the challenge criteria |
| 🌟 | Honorable mention | Notable effort or improvement |
| 👁️ | Unique perspective | Unusual or creative viewpoint |
| 🎯 | On target | Perfectly captured the week’s theme |
| 💫 | Wow factor | Surprising impact or “didn’t see that coming!” |
Weekly Checklist
- Set active week
- Assign/verify challenge
- Check quote of the day
- Tablets charged and ready
- Discuss quote (5 min)
- Review challenge (5 min)
- Gallery walkthrough (15 min)
- Photo capture (15 min)
- Upload & journalette (10 min)
- Review uploads
- Award stickers
- Edit journalettes if needed
- Prepare for next week
End of Session Checklist
- ☐ Generate class collage
- ☐ Export graduation package
- ☐ Print/distribute certificates
- ☐ Archive session
- ☐ Create new session for next class
Focus on Photography Plugin — Helping young photographers discover their creative voice.